


posted on
There is no escaping Wi-Fi. We need it every day. But, sometimes it could cause troubles very alien to us. For instance, your computer may start popping the error, ‘Wi-Fi doesn’t have a valid IP configuration’ out of the blue for no reason at all. This error means you are blocked out of internet completely. That’s why it needs to be fixed quickly. Here are some of the solutions that are known to have worked for most users.
But, before you try any of these, we would highly recommend you to try the most basic troubleshooting: Restart your router/modem and computer. This will ensure that your router or modem has refreshed the connection with the ISP and your Windows OS has refreshed the network drivers, services, and protocols. This method also works sometimes and you could spare yourself the many hassles.
In case it does not work, here are some of the solutions you can try.
Solution 1: Change SSID And password For Your Wireless Connection
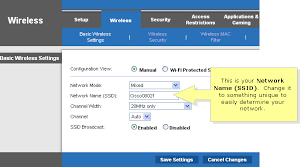
You may need to change the SSID and password of your Wi-Fi connection in order to fix the IP configuration issue. SSID is the name given to the Wi-Fi connection with which you connect to the internet (when you access the section where available Wi-Fi networks are listed, they are actually the SSIDs of those networks).
Since you are getting the IP configuration error message like wifi doesn’t have a valid IP therefore you will not be able to change SSID and password wirelessly. This is why you will need to access your modem using the Ethernet or LAN cable connected to your computer. If you don’t have the Ethernet wire you can buy it at any computer store.
Once you are connected to the modem you can change SSID and password. Remember that the steps vary across the modem models. This is why we will not be able to provide generic steps to change SSID that would be applicable to all modems. It would be a great idea to refer to the user manual of your modem or call up your internet service provider.
Solution 2: Reset TCP/IP
The internet protocols are supposed to work normally most of the times. However, at certain times your computer may develop a snag and thus may not pick the protocols correctly. In that case, resetting TCP/IP could be the right solution. This might also help you resolve the IP configuration issue. We will use the command called ‘netsh’ for this purpose. Here is what you need to do:
- Click the Start button or press the Windows key to open the Start menu. In the search box type ‘Command Prompt’ (without quotes). Right click on Command Prompt on the list and choose ‘Run as administrator’. If you are using Windows 10 then press Windows and X keys together and click on ‘Command Prompt (Admin)’
- When the Command Prompt window is open, enter ‘netsh Winsock reset’ (without quotes) and press Enter
- Now enter ‘netsh int IP reset’ (without quotes) and press Enter
- Close the Command Prompt window and reboot your computer
In most of the cases, this solution will Windows fix the IP issue. However, if you have been using static IP you will be required to set it once again.
If you are still getting the same problem, open the Command Prompt as admin again and enter the following commands one by one:
- ipconfig /release
- ipconfig /flushdns
- ipconfig /renew
Solution 3: Change the Channel Width to Auto
Changing the channel width to auto often enhances the Wi-Fi performance and re-establishes lost connection to the IP address. This is why it should be able to take care of the invalid IP configuration issue. Here is how you can do that:
- Press Windows and R key together to open the Run dialogue box. Now type ‘ncpa.cpl’ in the box and press Enter key. This should open the Network Connections window (if you are using Windows 8 or 10 you can press Windows and X keys together and then click on Network Connections on the list in the menu.)
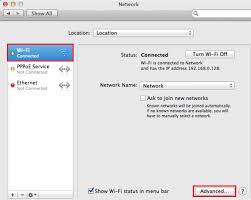
- On the Network Connections window you may see multiple connections (wired as well as wireless). You need to pick the Wireless connection which you are currently using (the one with which you are facing the problem). Right-click on it and click Properties from the popup menu. Now click the button ‘Configure’ on the Networking tab; another window will open on which you need to click on the ‘Advanced’ tab
- In the Property section, a list will appear where you can see the channel width for your adapter (it must include 802.11h). Select it and then for Windows 7 select ‘Enable’ from the ‘Value’ dropdown. For Windows 10 select ‘Auto’
- Click OK
This should be able to take care of the issue. If it does not, restart the router/modem as well as your computer. If the problem still persists, proceed to the next step.
Solution 4: Manually Set The IP Address
IP address is required to connect to the wireless network. It is usually provided by your internet service provider and the process is completed through DHCP. If there is a problem with DHCP, you will get the IP configuration error or wifi doesn’t have a valid ip configuration. One way to take care of this problem is to set the IP address manually. Here is how you can do that:
- Press Windows and R key together to open the Run dialogue box. Now type ‘ncpa.cpl’ in the box and press Enter key. This should open the Network Connections window (if you are using Windows 8 or 10 you can press Windows and X keys together and then click on Network Connections on the list in the menu.)
- Right click on the wireless network in question and then click Properties
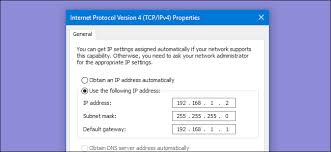
- Highlight ‘Internet Protocol Version 4 (TCP/IPv4)’ and then click on the button called ‘Properties’
- On the Properties window select the radio button with the label ‘Use the following IP address’ and enter the desired IP Address. You will also need to enter Default Gateway and Subnet Mask. If you are not sure what to enter here, you will need to contact your internet service provider.
- You will also need to provide the Preferred DNS Server and Alternate DNS Server
- Click OK when you are sure you have entered everything correctly
In case you encounter this error i.e., One Or More Network Protocols Are Missing On This Computer you can try some of the steps mentioned in the link above to solve the error.
Solution 5: Perform Clean-Boot
There are many third party services and applications that tend to interfere with the wireless connectivity. There is a chance you are experiencing IP configuration error because of them. In order to fix this issue, you will need to perform Clean Boot. Here are the simple steps:
- Press Windows and R key together to bring up Run dialog
- Enter ‘msconfig’ (without quotes) and press Enter (or click OK)
- Make sure that the General tab is selected
- Select the radio button for ‘Selective startup’ and uncheck the option ‘Load startup items’
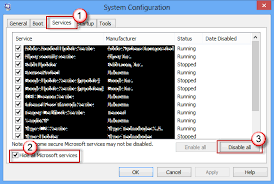
- Now select the ‘Services’ tab and check the option ‘Hide all Microsoft services’
- Now click on the button ‘Disable all’
- Select the ‘Startup’ tab now and click the link ‘Open Task Manager’
- It will open the ‘Task Manager’ with ‘Startup’ tab selected; you will see a list of the items; select each on each item one by one and select ‘Disable’
- Once all the apps have been disabled, exit Task Manager and go back to the msconfig window.
- Click OK to apply the changes
- Choose ‘Restart’ to restart your computer
Solution 6: Uninstall Antivirus And Reinstall It
Your antivirus or internet security program may sometimes have a conflict with the network connections. Try to disable Antivirus but if disabling does not work, uninstall and reinstall it. Here is how you can uninstall it:
- Press Windows Key or Click Start menu and click Control Panel
- Under ‘Programs’ category select ‘Uninstall a program’
- Now highlight the antivirus or internet security program and click ‘Uninstall’ on the top bar
You can later reinstall it using the CD or by downloading the installer from the official website (depending upon how you purchased it).

 (Updated 2020)")

")